

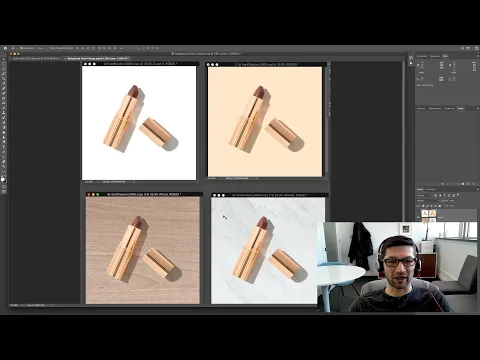
Products On What?? In this article, we’re going to teach you how to take your clipped POW product photos beyond the white background! Itching to make your on white product photos more inventive? With layered High Res Tifs +Clipping Paths, the means to create entirely unique product images are at your fingertips.
Check out the dazzling success of this technique in practice by our client, The HoneyPot Company. Their images are kicked up by the presence of cheerful colors, taking their product listing images to the next level. The chosen colors bring a high degree of personality to the photos, making them suitable for use as social media images. Stylish contemporary color palettes combining multiple products or shots with props create fantastic banner images.

The addition of color backgrounds feels creative and fresh while reinforcing a specific brand image, making them the perfect images for their website.
To purchase the layered tif, select the “Layered High-Res Tif File” as your advanced file type when placing your order. For an additional $5 per photo, we will deliver a High-Res file with your product and shadow on separate layers.
Continue reading for a quick step by step walkthrough on how to easily change the background of your image in photoshop with these Layered High Res Tif files.
Step 1: Getting Started
Before we begin, please note the two requirements to achieve the desired end results.
Requirements
- Adobe Photoshop (recommended)
- Download an example file from the video to practice on here
Begin by opening your layered tif file in photoshop
Under the layers window, you will notice that the product and shadow are on separate layers.
Note that the shadow layer is already set to “Multiply”; this gives the layer transparency that will allow the background color and texture to show through.
Step 2 Changing The Color Of Background
Add a new layer for your background by clicking the “Add new layer” button located in the bottom of the layers panel. Looks like a plus with a square around it. The Key Command is Command + Shift + N
The order of your layers is important; this layer should be ordered beneath the product and shadow layers, as this is the order it will appear in the image.
To rearrange the layer order, simply drag and drop the layers into the correct order in the layers window
Now you can begin to play around with your background. Along the toolbar to the left, you can use the color picker or the eyedropper to select any color. Fill the background layer with the color you selected using the fill bucket or even the gradient tool, again found along the toolbar. The keyboard command to fill with foreground color is Option + Delete.
Step 3 How to add a background photo into your shot
First open a background image from our computer in Photoshop.
Next, drop the background into our photoshop file by grabbing the layer preview in the layer window of our background file, and dropping it over in our product photo Photoshop file. Hold shift when you do this and it will align automatically.
Be sure to arrange the background layer behind all other layers… and there it is. Press V to switch to the Move tool to grab and move the layers around. If you're running into troubles moving stuff around you don't want to move, look to make sure the "auto-select" check box is unchecked in the upper left menu bar.
You can resize and reposition your new background behind your product to suit your needs. Select the background layer and press Command+T to bring it into transform mode. Handles appear that allow you to rotate or resize the image, as well as easily move it around. We’ve locked our product and shadow layers to prevent them from being moved around in the process.
Conclusion
We hope this tutorial has helped demonstrate the simplicity of changing the background of your product images by utilizing Layered High-Res Tif file (Clipping paths). Once you master the minor complexities photoshop, the creative possibilities for your images really are endless!
Feel free to ask questions in the comments below & we'll get back to you with answers!

